
![]()

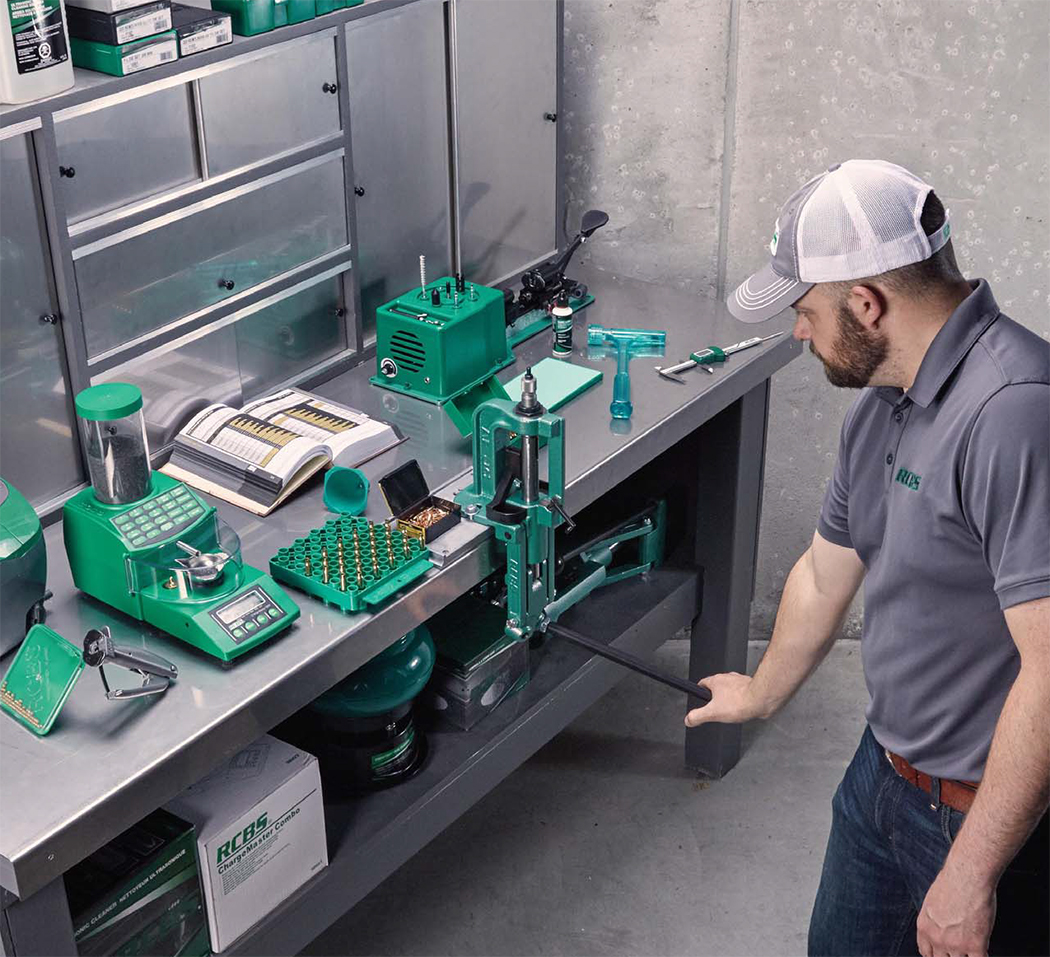
HANDLOADING IS NOT ONLY A REWARDING AND ENJOYABLE HOBBY, IT MAKES ECONOMICAL SENSE AND ALLOWS YOU TO PRODUCE THE MOST ACCURATE AMMUNITION. LEARN FROM THE EXPERTS AT RCBS.
Welcome to the challenging and rewarding hobby of handloading, also called reloading, or sometimes just called loading. Whatever you call it, we think you’ll find handloading to be a fun, safe and economical addition to your shooting sports. A lot has been written about handloading, but to many it is still a subject of mystery. So before we can get into the tools and steps involved, let’s take a minute to answer a few questions about handloading. The more you know about handloading, the more you’ll understand why more than five million hunters and shooters are enjoying this exciting hobby.
![]() RELOADER RESOURCES
RELOADER RESOURCES
From print publications to manufacturer websites and online social community sites, the modern reloader has more options at their fingertips then ever before. Make sure to read handbooks, manuals and guidelines from reputable sources. Talk to experienced reloaders. Write or call suppliers of components if you have questions or are in doubt. Always remember that to become or continue to be a safe reloader, you must be careful at all times.
Customer Service
Need help? Expert advice and fast, courteous customer service is just a phone call away. Our toll-free number is 800-379-1732.
RCBS Ecommerce
To see our product offerings or to learn more about RCBS, visit us at RCBS.com. Please call customer service to place product orders.
Quality Products
All RCBS products are made with quality and care, and are backed by our lifetime warranty. Electrical products come with a two-year limited warranty and electronic components come with a one-year limited warranty. All other RCBS products are warranted for the life of the original consumer purchaser. Full warranty details can be found on page 14, at rcbs.com, or wherever fine RCBS products are sold.
![]()
How safe is handloading?
In a word, very – because today’s smokeless gun powders are a lot different than the old black powders of our ancestors. In fact, modern smokeless powders are classified as propellants, not explosives, meaning when properly used, these powders only burn when ignited. So, while common sense and certain precaution should not be ignored, handloading is by no means a high risk hobby. ALWAYS REMEMBER TO WEAR SAFETY GLASSES WHILE SHOOTING AND HANDLOADING.
How good is handloaded ammo?
The truth is, carefully handloaded ammunition is usually better than factory loaded, because it can be fine-tuned to fit a specific gun and a certain type of shooting. The result is far greater accuracy.
How complicated is handloading?
It’s simple. There are only four components to a rifle or pistol cartridge: The primer, the powder, the bullet and the brass case. When a cartridge is fired, the primer ignites the powder, the powder then propels the bullet out of the barrel. All that’s left is the brass case and the spent primer. This is where handloading comes in. The brass case can be reloaded over and over.
How much money does reloading save?
A lot. Take 30-06 factory ammo for instance. At today’s prices, each round cost about $2 each. Of that, the primer, powder and bullet account for about $0.70. So about $1.30 of every factory round is chalked up to the brass case plus the expense of loading it. Since you will be using the case over again, you save nearly 65% over factory ammo or about $26 per box of 20! That’s why handloaders generally make better shooters, because they can afford to practice more.
How much equipment does it take?
Surprisingly little. The truth is you can get all the equipment you need to start our with for $300-$500. If you do much shooting at all, this amount can be saved in your first year alone.
How many types of cartridges can be reloaded?
Most any except rimfire type, like .22’s. Most brass cases can be reloaded 5 to 20 times, depending upon the cartridge and powder charge. Besides the standard cartridge, RCBS has the tooling to make over 3,100 custom loading dies, so there’s no limit to what can be handloaded.
![]() BASIC COMPONENTS NEEDED TO START HANDLOADING
BASIC COMPONENTS NEEDED TO START HANDLOADING
 Primers
We recommend Federal or CCI. These are the “spark plugs” that initiate the entire ballistic chain reaction with the squeeze of a trigger. Every Federal and CCI primer provided consistent, reliable performance. Available to fit pistol or rifle calibers. The Primer Chart on page 12 will help you make the right selection.
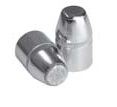 Bullets
Count on Speer to provide the best bullet for the job. Speer offers affordable solutions for every type of bullet. Take a look at Speer’s latest catalog for a complete line-up of bullets.
 Powder
You’ll have a choice of several different powders. Look to Alliant Powder for the best powders on the market. Choose the one that performs best for your particular cartridge. Consult a reloading manual for more information.
 Brass
Brass
Stock up on quality brass. If you’re reloading centerfire, we recommend Federal Premium’s first run, unprimed brass. They’re available in a variety of common calibers for the rifle and handgun.
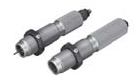 Reloading Dies
These are the most important link in the reloading process. You’ll need a set of dies for each caliber you plan to reload. There are three dies in sets used for loading straight-wall type cases and two dies in sets used for loading bottleneck type cases. The third die in the 3-die set is used to expand the mouth of straight-wall cases. In a 2-die set, expanding is done in the sizer die.
 Shell Holder
Shell holders provide a firm grip on the case to insure trouble-free reloading. Match your shell holder to the calibers you’ll be reloading. The chart is on page 12.
A Place to Reload
You will want to get a bench that is extremely sturdy and will withstand the pressures of any reloading press or tool. Make sure it has plenty of room to mount presses and other equipment, plus storage areas for accessories and components.
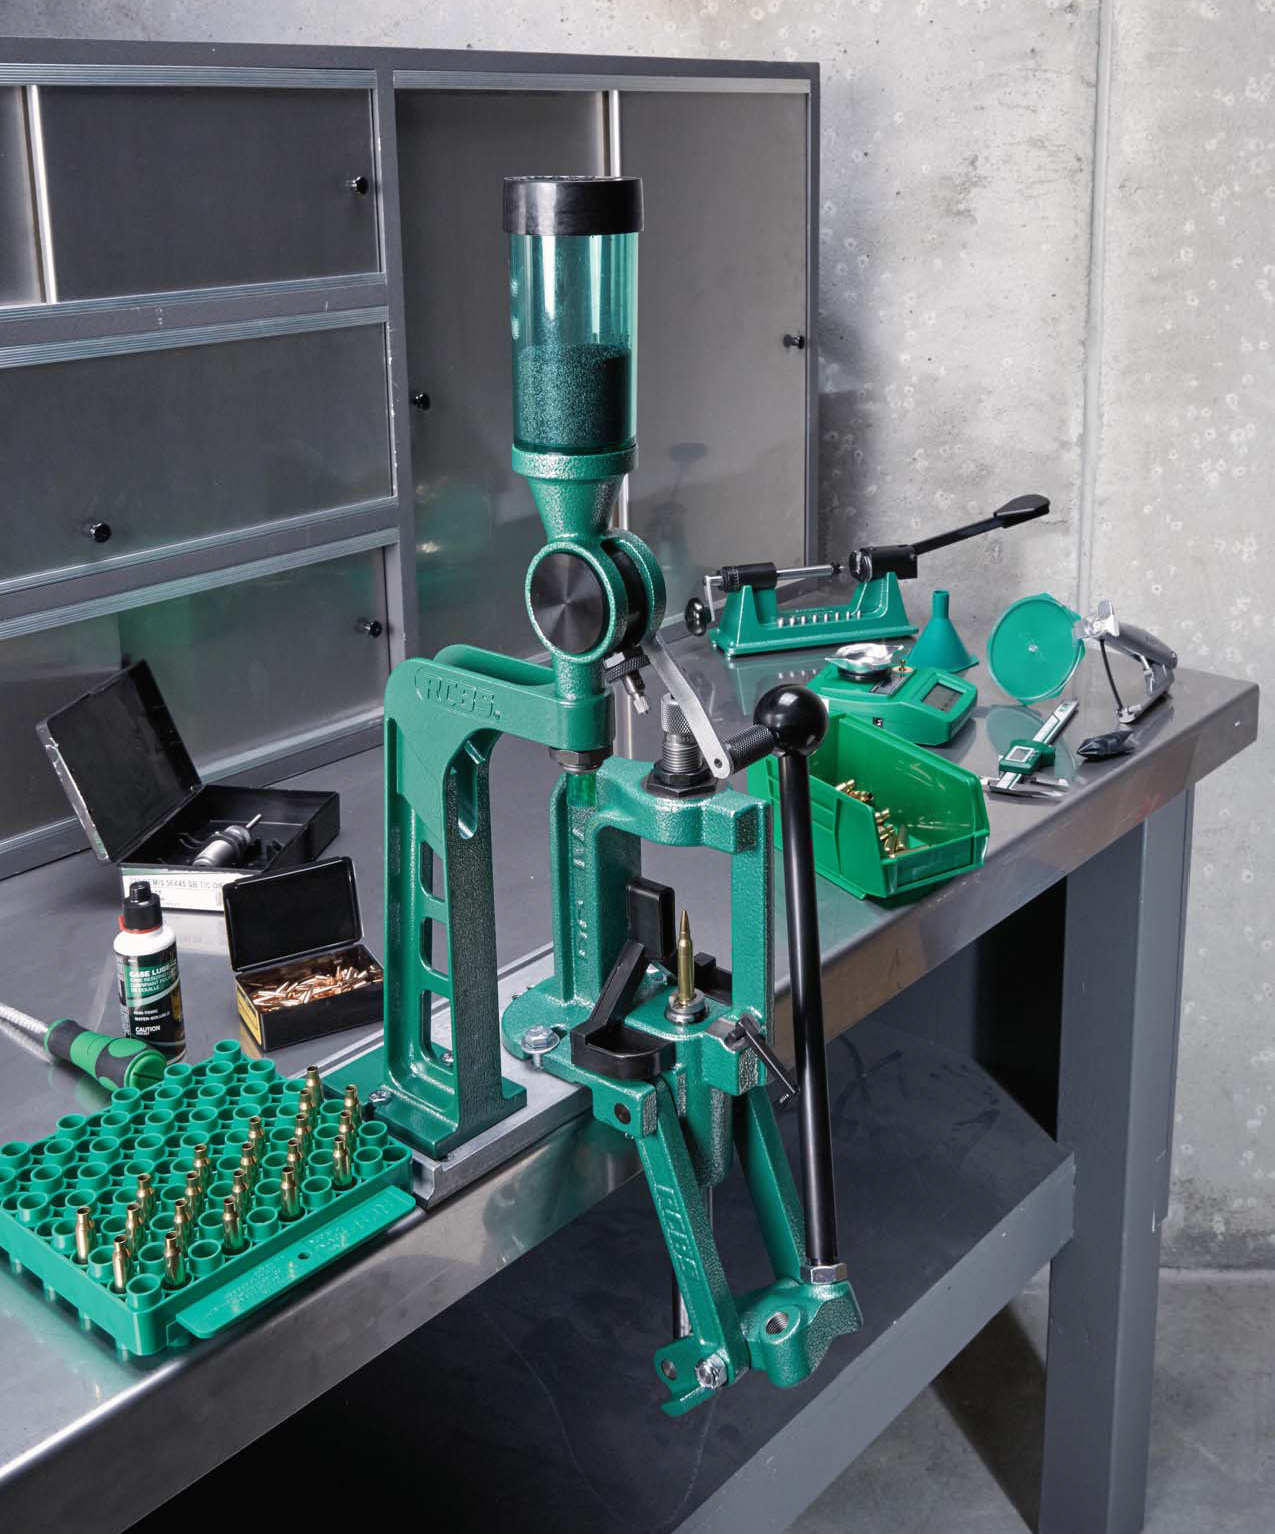
![]()
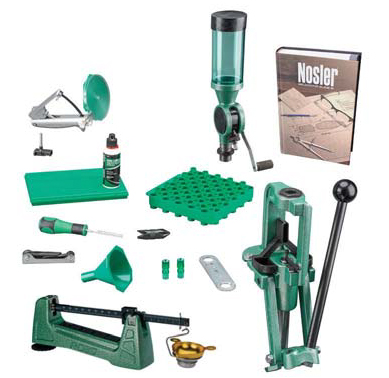
ROCK CHUCKER SUPREME MASTER RELOADING KIT (PART NUMBER 9354)
This kit contains everything you need to get started reloading like a pro. A simple, complete solution for beginners and experts a like. All you need to provide are the dies, bullets, primers, cases, powder, and shell holder.
M500 Mechanical Scale
Provides right- or left-handed operation and a wealth of big-time features at an affordable price. It’s accurate, fast, and rugged – everything you need in a scale to make loading easier.
Nosler Reloading Manual
This is the complete, step-by-step, top-rated reference for everything you want to know about handloading. It contains more than 600 pages of information, data, and illustrations.
Accessory Handle-2
Ergonomic handle for use with many RCBS accessories.
Hex Key Wrench
This features eight heat-treated hex keys in one compact unit. It fits most hextype setscrews on RCBS equipment.
Deburring Tool .17-.60
The large Deburring Tool allows the inside and outside chamfering and deburring of cases from 17-caliber up to 60-caliber. This is the one deburring tool that will do it all!
Powder Funnel
A funnel is handy for pouring the correct powder charge into the case. It is specially designed to avoid powder spills around the case mouth.
Case Lube Kit
One of the first steps in handloading is to carefully clean and lubricate the fired cases. This kit contains a bottle of our Case Lube-2, a case lube pad and two case neck brushes.
Hand Priming Tool
Prime cases separate from the reloading bench. The tray can hold up to 100 primers. It uses the same RCBS shell holders as RCBS presses. Includes large and small primer plugs.
Universal Case Loading Block
A convenient holding platform with a two-sided design offers three different case fits per side. It’s perfect for holding up to 50 cases during the powder charging process.
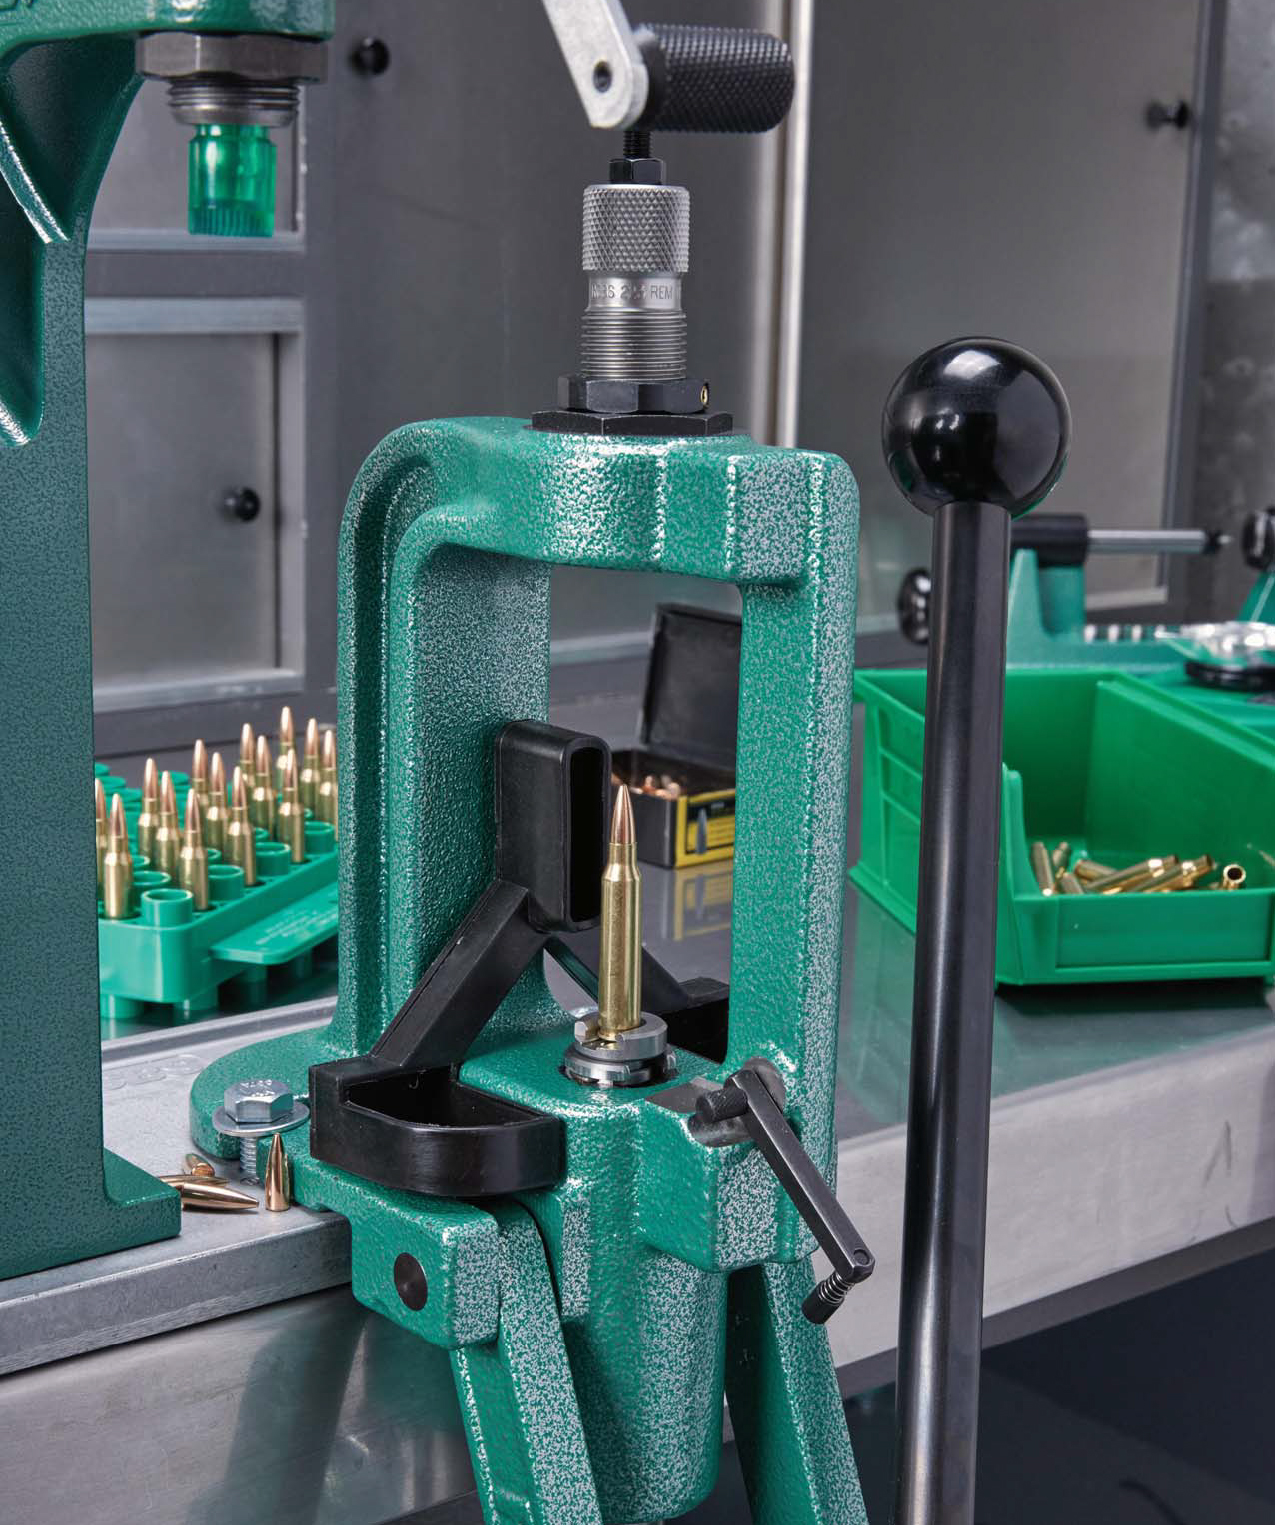
Rock Chucker Supreme Reloading Press
This is by far the single biggest piece of equipment involved. As you’ll see on the following pages, the press is used to resize the brass cases, replace the fired primers and seat the bullet.
Uniflow Powder Measure
The Uniflow can greatly speed up the powder charging step. A predetermined charge of powder can be dispenses quickly and easily with each crank of the handle. This eliminates the need to weigh every single load.


FOLLOW THIS STEP-BY-STEP GUIDE USING THE TOOLS FROM THE ROCK CHUCKER SUPREME MASTER RELOADING KIT, AND YOU’LL SOON BE RELOADING LIKE A PRO.
1. Clean and Check
Using a soft cloth, wipe each case clean to prevent dirt from scratching the case and the sizing die. Inspect the case for anything the would keep it from being safely reloaded, such as split case mouths, case head separations, excessive bulges and other case defects. Any case found to be defective should be thrown away.
2. Lubricate the Cases (Part 1)
Because of the force involved, you’ll need to lubricate the cases before they go into a sizer die. Spread some lube on the pad and lubricate the body of the case. Make sure not to lube the shoulder of your cases as this can cause dents. If you’re using a carbide sizer die for reloading straight-wall pistol cases, you can eliminate this step. The carbide rind in the sizer die is so smooth that cases simply can’t get stuck in the die.
3. Lubricate the Cases (Part 2)
Clean dirt and powder residue from inside case necks and simultaneously add a light coating of case lube with a case neck brush. This will reduce the sizing effort and prevent excess working of the brass. Roll the brush across the lube pad after every three or four cases for just the right amount.
4. Install the Shell Holder
Snap a shell holder into the press ram with a slight twisting motion. The shell holder will securely grip the head of the cartridge case. Check out our latest catalog or see your local dealer for help in selecting the correct shell holder, or reference the chart on pages 12-13.
5. Install the Sizer Die
Thread the sizer die into the press until the die touches the shell holder when the ram is at the top of the press stroke. Raise the press handle and turn the die down another one-eighth to one-quarter of a turn and set the large lock ring. If you’re using a carbide sizer die, leave a 1/16″ gap between the bottom of the die and shell holder.
6. Insert the Case
With the press handle in the up position, slide a case into the shell holder.

7. Size the Case
Gently but firmly lower the press handle all the way to the bottom and run the case all the way into the sizer die. This will size the case to the proper dimension and push the fired primer out of the case. Next, raise the press handle. This will lower the case and expand the case mouth (on bottle-neck cartridges), corerctly setting the case neck diameter to hold the bullet tightly.
8. Check the Case Length and Trim if Necessary
After several firings, cases sometimes stretch and become longer than the specified maximum length. These cases must be trimmed to allow for proper chambering and for safety reasons. The trimmer works like a small lathe and can be used to trim most cases through 45-caliber. Check the reloading manual for maximum case length and trim length.

Use a dial or digital caliper to check the exact case length. Check the reloading manual for maximum case length and trim length.
9. Chamfer and Deburr
Cases that have been trimmed need to also be chamfered and deburred. This will remove any burrs left on the case mouth after trimming and will allow a new bullet to be easily seated into the case. Insert the pointed end of the Deburring tool into the case
to remove burrs and chamfer the case mouth interior. Fit the other end over the case mouth to remove exterior burrs.
10. Expand the Case Mouth (applies only to straight wall cases)
Because of their design, straight-wall cases need to be expanded in a separate expander die. Install the expander die in the press, place a sized case in the shell holder and run it into the die. The expander should be adjusted so the case mouth is belled outward just enough to accept the new bullet.
11. Priming Tray
To use, first scatter primers onto the grooved surface of the tray. Then, shake the tray horizontally until all the primers are positioned anvil side up
12. Prime the Case (option 1)
The Hand Priming Tool seats primers quickly. Insert primer tray into Hand Priming Tool. Use the cartridge-specific RCBS shell holder (the Hand Priming Tool is ONLY compatible with RCBS shell holders). The proper primer plug adapter size (large or small) must be installed. Insert the case and squeeze the handle, which inserts the primer. Check to ensure the primer is seater to the proper depth – flush with the case. Repeat as needed.
The advantage of the Hand Priming Tool is that it can be used separate from the reloading bench.
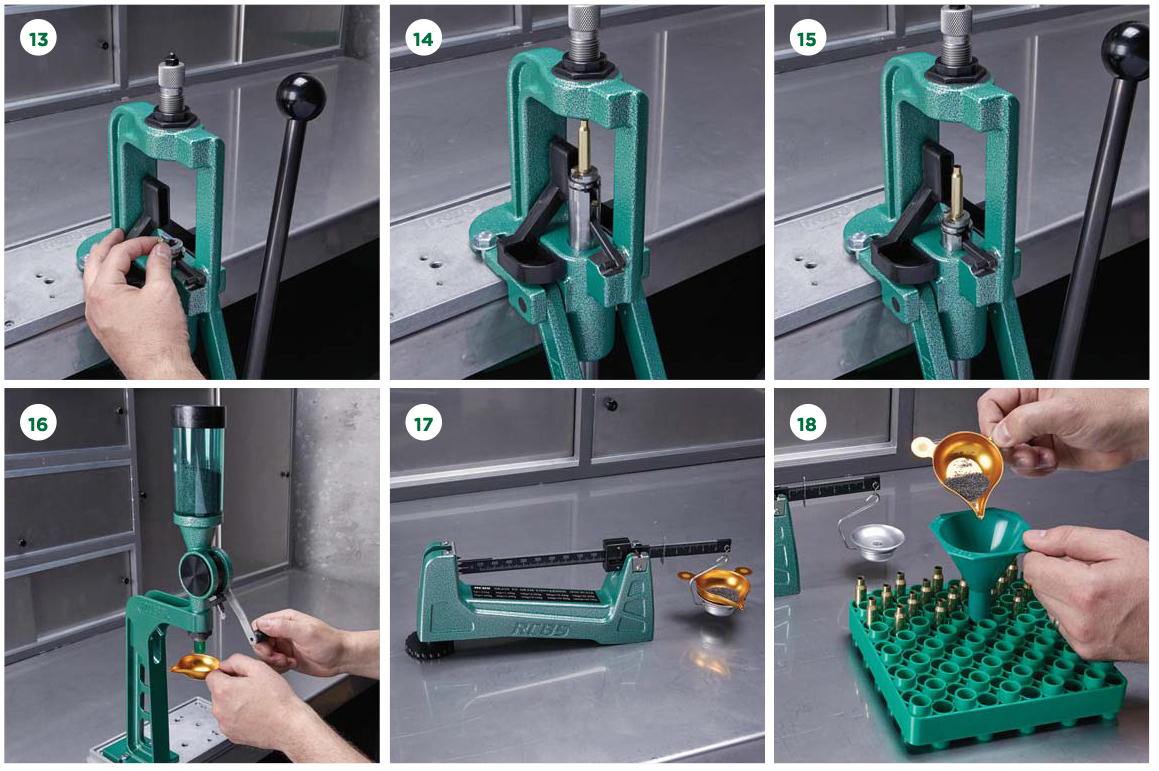
13. Prime the Case – With the Press (option 2, part 1)
Place a fresh primer, anvil side up, into the cup of the primer arm.
14. Prime the Case – With the Press (option 2, part 2)
Slightly raise ram and insert the case into the shell holder. Run the case up into the sizing die.
Tip for Priming the Case
For a faster way to prime cases, use the hand priming tool that is included with your Rock Chucker Supreme Reloading Kit or purchase separately the Rock Chucker Supreme Auto Prime. Primers drop one at a time into the primer arm on the press. Hand priming can be done away from the bench.
15. Prime the Case – With the Press (option 2, part 3)
Now, gently and slowly raise the press handle. As the case is drawn out of the sizing die it will be lowered onto the fresh primer which will be seated into the primer pocket. Push the handle all the way up. Inspect the primer to make sure it is properly seated. In order to gain optimum primer sensitivity, the primer must be seated firmly to the bottom of the primer pocket.
16. Setting Powder Measure (part 1)
You can dispense a precise charge, without weighting every charge on a scale. Fill the measure with powder and dispense several charges to establish flow and settle the powder in the hopper. Return the dispensed powder to the hopper. Use your reloading scale to adjust the powder measure. Weigh every charge until several consecutive charges show the desired weight. Re-check the weight about every 10 cases.
17. Setting Powder Measure (part 2)
Consult the reloading manual to learn what kind of powder, and exactly how much is recommended to reload your cartridge. Then weigh the recommended charge on your scale.
18. Setting Powder Measure (part 3)
After accurately weighing the powder charge, pour it into the case using a powder funnel.
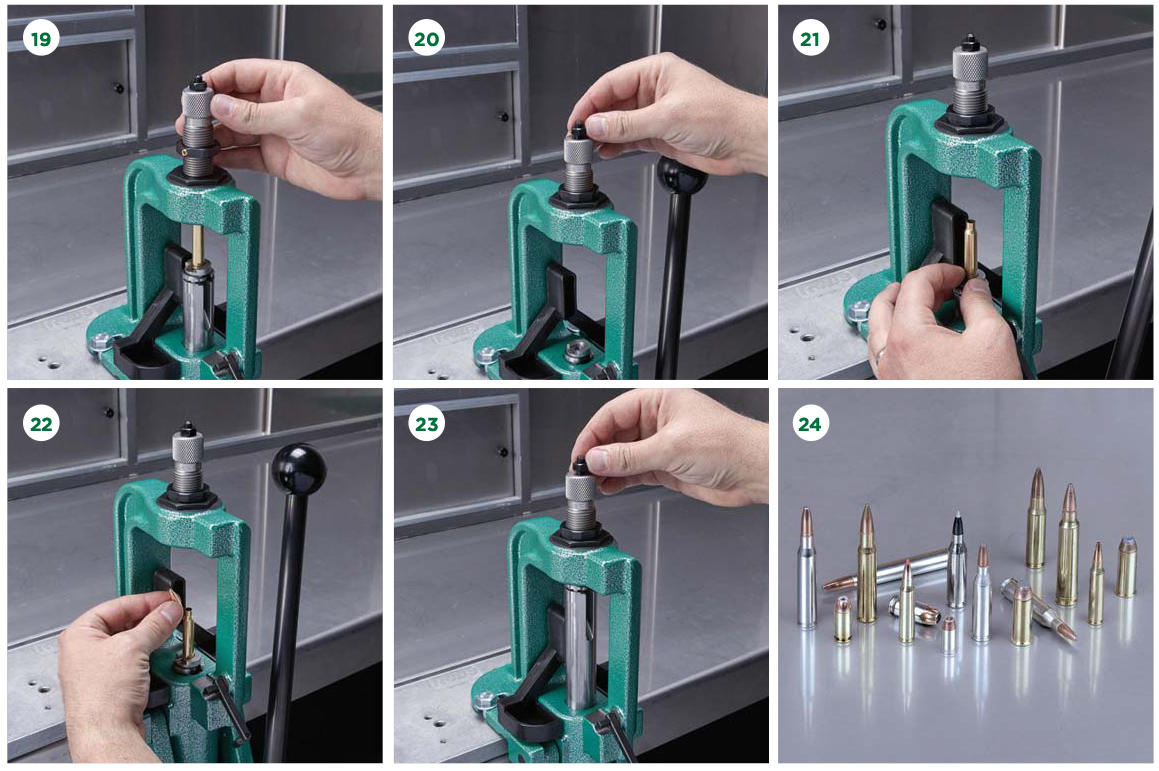
19. Bullet Seating (part 1)
Thread the seater die a few turns into the press. Put a case in the shell holder and lower the press handle, running the ram with the case to the top of the press stroke. Turn the die body down until it stops. The crimp shoulder in the die is now pressing against the top of the case mouth. Back the die out one turn, raising the crimp shoulder above the case mouth. Secure the die in position with the die lock ring.
20. Bullet Seating (part 2)
Loosen the locknut, used to secure the seat plug, unscrew the bullet seater plug enough to keep the bullet from being seated too deeply.
21. Bullet Seating (part 3)
With the handle in the up position, insert a properly primed and charged case into the shell holder.
22. Bullet Seating (part 4)
Take a bullet and hold it over the case mouth with one hand while you lower the press handle with the other, easing the case and bullet up into the die. After raising the handle, note the seating depth of the loaded round. If the bullet needs to be seated deeper into the case, turn the seater plug down.
23. Bullet Seating (part 5)
Run the loaded round back up into the die, raise the press handle and check the seating depth again. A few more adjustments may be needed for the proper bullet seating depth; then, you simply tighten the locknut to secure the bullet seater plug.
See our reloading die instructions for more detailed information about bullet seating and crimping.
24. That’s it!
Your first reloaded cartridge is ready to be fired. Of course, we’ve descried only one case going through all the reloading steps. When actually reloading, you’d take a batch of cases through each operation before moving on to the next step.

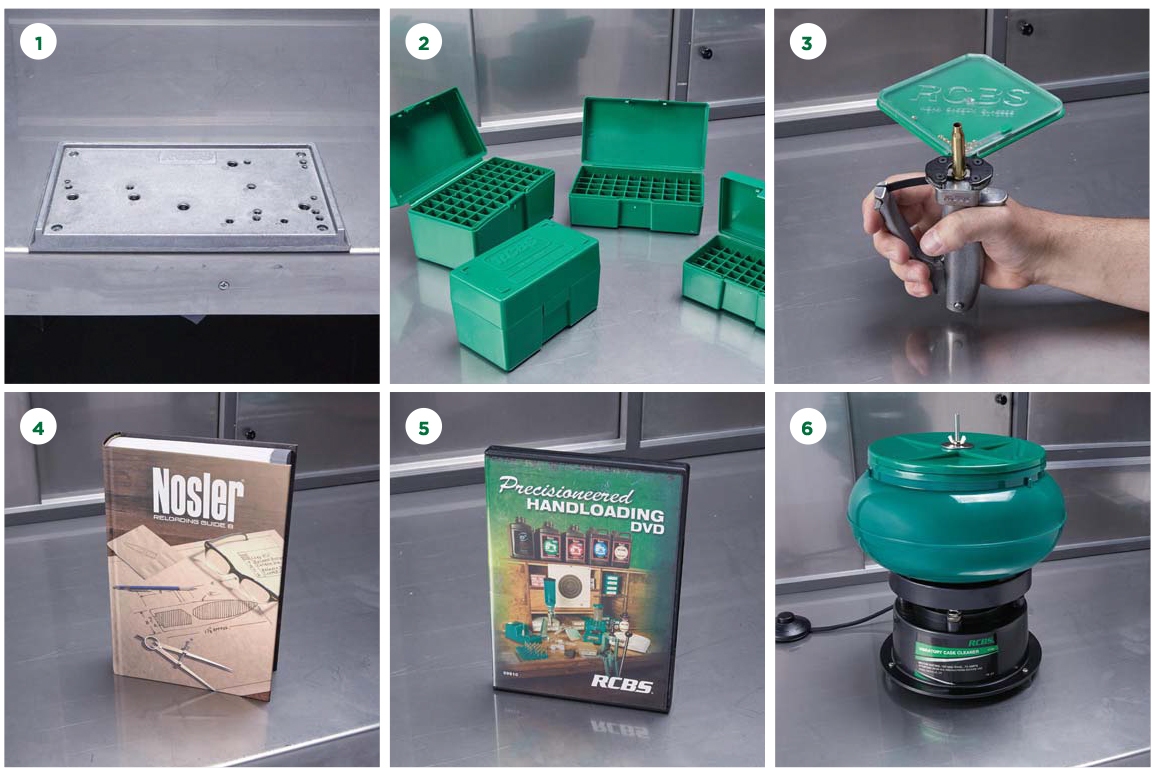
1. Accessory Base Plate – 3
This handy product saves time and eliminates a bench top full of holes. Attach the base plate to any work surface, then use its pretapped, letter-coded holes to quickly mount or dismount reloading tools.
2. Ammo Boxes
Available in five sizes. Perfect for storing loaded ammunition. Made of tough plastic with flush exteriors, recessed latches, anti-rattle bullet tip nest and a long-lasting hinge.
3. Universal Hand Priming Tool
Perfect for reloaders who like to prime cases off the press. The universal shell holder will accept cases from .32 ACP to .45-70 Government. Primers feed automatically. Primers feed automatically from the tray to prevent contamination by oily fingers.
4. Nosler Reloading Manual
The bible of reloading and the number one reference worldwide. Contains charts, illustrations, photos and valuable how-to information.
5. Precisioneered Handloading DVD
Whether you’re an old pro or just getting started in handloading, this is the best 30-minute investment you’ll ever make. Both entertaining and educational – a must see for the do-it-yourselfer.
6. Vibratory Case Cleaner**
Fast dry-media case cleaning. Holds up to 400 38 cases or 180 30-06 cases. Removable lid lets you check cases during cleaning.
7. Ultrasonic Case Cleaner
Rapidly removes tarnish, carbon buildup and metal oxides from brasses cases in conjunction with RCBS Ultrasonic Case Cleaning solution. Large 3.2-quart stainless steel tank. Features keypad with timer and five preset temperature settings, 60W transducer, 100W ceramic heater and 36kHz ultrasonic frequency.
8. Chargemaster Combo
Digital way to measure powder. The ChargeMaster Combo dispenses all typed of smokeless powder; cylindrical, flake or ball. Charges are quickly dispensed to within +/- 0.1 grain. Fast, convenient and total accuracy at the push of a button.
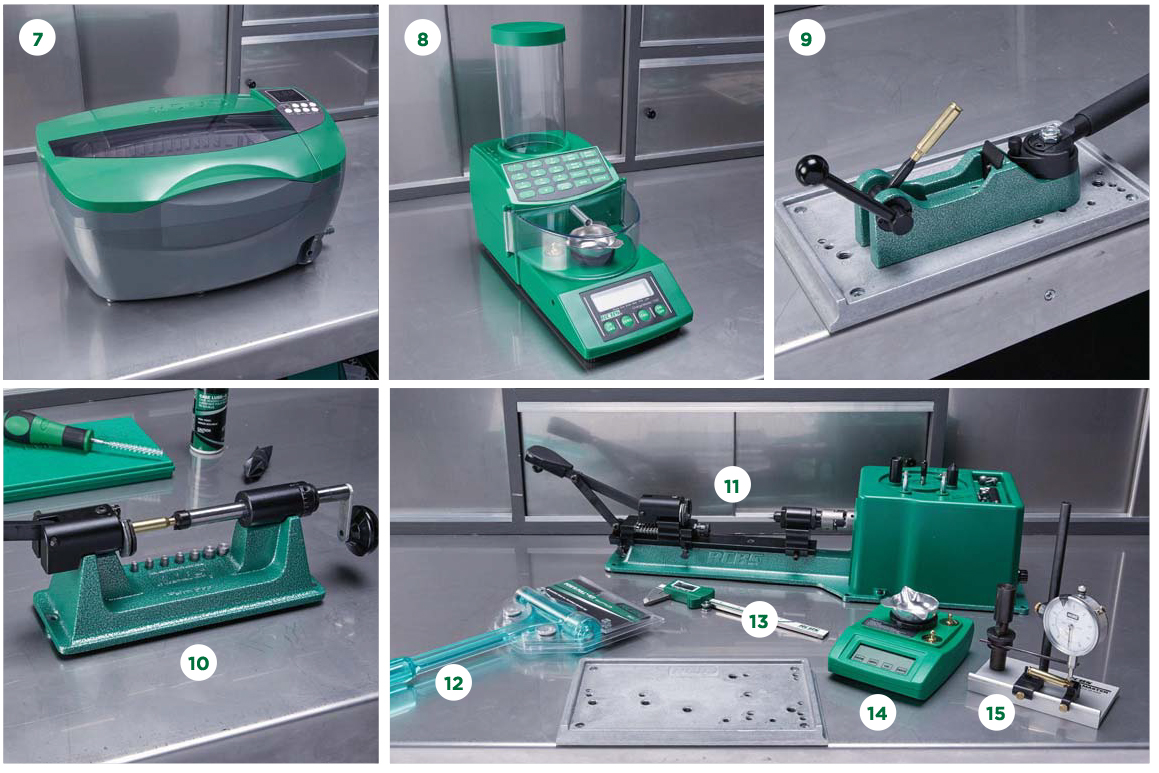
9. Primer Pocket Swager – Bench Tool
Bench-mounted tool makes removing primer pocket crimp/stalking, typically found on AR or military brass, a simple task. Sturdy construction, including foam-padded grip, requires 35 percent less force to complete the job compared to similar tools. Case is held in place by a hardened steel rod. Rotate the case into position, and the job is completed with an easy pull and push of the handle.
10. Trim Pro-2 Manual Case Trimmer
Spring-loaded universal shell holder securely locks cases aligns them with the cutter. Trimmer is designed for .001″ accuracy, with coarse and fine trim adjustments. Accommodates case head diameters friom .250″ t0 .625″ rims; fits cases from 5.7mmx28 to .338 Lapua Magnum.
11. Universal Case Prep Center**
A reloader’s ultimate dream tool: saves hours of time and makes case prep a breeze. Powered by a 24-VDC motor that provided 9 inch-pounds of torque. Features six stations of operation (four up to 360 RPM; two up to 550 RPM). Has ambidextrous, single-lever operation. Accomodates case head diameters from .250″ to .625″ and lengths from .720″ t0 3.375″ Includes accessories and limited two-year warranty.
12. Pow’r Pull Kit
Get yourself out of a jam with this reloading essential. Three-jaw chick grips rim securely. Bullet drops into chamber, damage-free, for reuse. This can accommodate cases from 5.7x28mm and .22 Hornet up through the WSM and RUM family of cartridges. Made of high impact strength plastic.
13. Electronic Digital Caliper
Be more precise with this easy to use measuring device. Caliper features easy-to-read numbers and accuracy to +/- .001″/.02mm. Hardened-steel body prolongs tool life. Adjusts to zero at any position. Measures internal, external, depth and step dimensions. Battery Included.
14. Rangemaster 2000 GR 120/240 VAC/DC*
Highly accurate 2000gr capacity. Measures in grains or grams. Compact and lightweight. AC or battery powered.
15. Case Master Gauging Tool
Quick, accurate measurement of case neck concentricity, thickness, length and bullet run-out.
16. Stuck Case Remover Kit (not pictured above)
Extracts stuck cases from standard sizer dies without damaging the die, using a very simple two-step removal process.
*Limited one-year warranty. **Limited two-year warranty. For more information call 800-379-1732.

Reloading has its own “Language”. Here are some words to familiarize yourself with. See the Nosler Reloading manual for more reloading information.
Bell
To flare a case mouth to receive a bullet easily.
Bullet
A piece of metal formed into a projectile. Available in a variety of shapes and weights.
Bullet Swaging
The forming of a bullet using pressure in a die instead of casting molten lead in a mould.
Caliber
The approximate diameter of a bullet or gun bore.
Cannelure
One or more grooves cut around the circumference of a bullet where the crimped case can grip the bullet.
Cartridge
A completely loaded, ready-to-fire round of ammunition.
Case
A metal cylindrical container which holds the primer, powder and bullet. Also called brass.
Case Forming
To form cases of one caliber into a different caliber.
Chamfer
To bevel the inside of a case mouth. The bevel allows rifle bullets to start into the case mouth without crushing the case.
Chronograph
An instrument used to measure the velocity of a bullet.
Components
The parts that make up a cartridge. The case, primer, powder and bullet.
Crimp
To bend inward the mouth of a case to grip the bullet. Used only with bullets having a cannelure or crimping groove.
Deburr
To remove the small metal burrs from inside and outside of a case mouth.
Decapping
Removal of the spent primer from a fired case.
Decapping Pin
The slim needle-like rod in the sizer die which pushes out the spent primer.
Expander
The part of the die that expands the case mouth to receive the bullet.
Flash Hole
The hole through which the primer ignites the powder charge in the bullet.
Handloading
Another term for reloading.
Hangfire
Slang term form any detectable delay in cartridge ignition.
Ignition
The action of setting a powder charge on fire.
Jacket
The cover or “skin” of a bullet.
Misfire
The failure of a cartridge to fire after the firing pin strikes the primer.
Neck
That portion of a case which grips the bullet. In a bottlenecked case, that portion of the case in front of the shoulder.
Neck Sizer Die
A die used to resize only the neck portion of the fired case back to approximately its original dimensions.
Powder
The substance that ignites in the cartridge and propels the bullet.
Powder Charge
The amount of powder loaded into a case.
Primer
The small cap containing a detonating mixture used to ignite the powder charge in case.
Primer Pocket
The cavity in the bottom of a case into which the primer is seated.
Primer Pocket Swaging
The “smoothing out” of the crimped primer pocket found in military cases.
Priming
Installing a new primer into a case
Progressive Press
Allows the used to achieve multiple steps of the reloading process simultaneously. RCBS Progressive Presses are fully customizable and allow the user to reload up to 600 rounds per hour.
Ram
The steel rod running through the center of a press that holds the shell holder and drives the case into the die.
Reloading Press
The tool which performs the major tasks of reloading.
Resize
To restore a fired case to approximately its original size.
Round
A military term for one complete cartridge
Seater Die
The die that seats the bullet into the mouth of the powder charged and primed case.
Seating Depth
The depth to which a bullet is seated in the case mouth.
Shell Holder
The part that holds the case in proper alignment while the case is being run onto the die.
Sizer Die
A die used to resize a fired case back to approximately its original dimensions.
Spent Primer
A primer that have been fired.
Ultrasonic (case cleaner)
Very high vibrations generated by an ultrasonic case cleaner that are used to clean brass cases. The ultrasonic case cleaning solution, removing buildup and restoring luster to brass cases.
![]()


Important: RCBS Shell Holder numbers do not correspond to those of other manufacturers. When two Shell Holders are listed, the most popular is shown first. It may be necessary to use the alternate, depending on the manufacturer and/or lot of cases being used. The numerals in ( ) in the table indicate the following: (2) cases are usually Berdan primed. Depriming and priming must be done by hand. If cases were formed from cases having boxer-type primers, use the appropriate Shell Holder for that caliber. (4) not available. (5) Auto 4×4 Shell Plate not available. (6) Auto 4×4 and Five-Station Shell Plates are available.
Ammo Box size code: SR=Small Rifle, MR=Medium Rifle, LR=Large Rifle, MP=Medium Pistol, LP=Large Pistol. *Rotary Case Trimmer-2 only. ** For Ten-X

![]()
Lifetime Warranty (limited to original owner)
RCBS Presses, Dies, and mechanical accessories, (does not include electric-powered accessories), are warranted to be free from defects in material or workmanship for as long as the original owner owns it.
One Year Limited
RCBS electronic accessories (digital scales, ultra-sonic equipment, etc.) are warranted to be free from defects in material or workmanship for a period of one year from date of purchase.
Two Year Limited
RCBS AC electrical-operated accessories (Trimmers, Tumblers, Furnaces, etc.) are warranted to be free from defects in material or workmanship for a period of two years from date of purchase.
All RCBS warranties are extended only to the original consumer purchaser. All RCBS products are intended for non-commercial use by hobbyists. Any other use of these products will void the warranty. If you believe that your product is covered by this warranty, you must return the product to RCBS at the address below, postage paid, with proof of purchase for evaluation.
If covered, we will (at our sole option) repair, replace, or refund the purchase price of any part or product found to be defective. This remedy will be without charge except for reasonable shipping, handling and insurance charges. TO ENSURE ACCURACY OF YOUR WARRANTY INFORMATION, SEND A COPY OF YOUR DATED PROOF OF PURCHASE TO THE ADDRESS ON BACK OF COVER OF MANUAL.
This limited warranty does not cover defects or damage resulting from carelessness, misuse, commercial use, abuse, neglect, improper installation or assembly, water submersion, unauthorized or improper repair, failure to follow operation instructions, modification or normal wear and tear.
ANY WARRANTIES IMPLIED BY LAW SHALL IN NO EVENT EXTEND BEYOND DURATION OF THIS EXPRESS WARRANTY. Some stated do not allow limitations on how long an implied warranty lasts, so the above limitation may not apply to you. REPAIR OR REPLACEMENT AS PROVIDED HEREIN IS YOUR EXCLUSIVE REMEDY FOR ANY DEFECTIVE PRODUCT. IN NO EVENT SHALL WE BE LIABLE FOR ANY SPECIAL, INCIDENTAL, OR CONSEQUENTIAL DAMAGE OF ANY KIND ARISING OUT OF THE PURCHASE OR USE OF THIS PRODUCT, WHETHER BASED UPON CONTRACT, TORT, STATUTE OR OTHERWISE. Some states do not allow the exclusion or limitation of incidental or consequential damages, so the above limitation or exclusion may not apply to you. This warranty gives you specific legal rights, and you may also have other rights which vary from State to State.
![]()

- Categories:
- Firearms